
VU Meter Ring Guide | What is VU Meter Ring | Why Important in Music
We all love good music. It puts our mood right and helps us relax. A VU meter indicates the intensity of the music with LEDs.
A VU meter is an abbreviation for Volume Unit meter. VU meters can also be implemented in the form of patterns, which look really beautiful when paired with good music.
This project will serve as a tutorial on how you can build your very own ring VU meter, which has 6 patterns.
Components Required
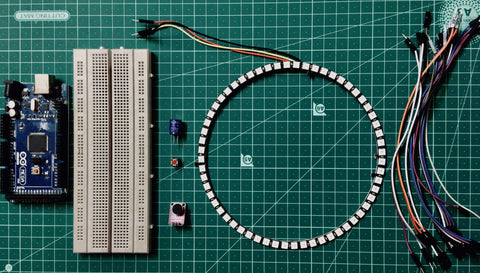
I would suggest only using either of the two variants of the Arduino board, as whether the other boards would be able to provide enough current to drive the LED ring is doubtful. In case you find the ring seeming dim, add a 5 volt 2 amp supply to the LED ring.
The Electret microphone is used to convert sound into electrical signals. However the signals are too small and require amplifying. Henceforth we use this module.
These types of RGB LEDs are known as NeoPixels. By varying the red green and blue values from 0 to 255, these NeoPixels can bring up any colour from the colour wheel. Another advantage of using the NeoPixels is that they are controlled by a single data line. This saves us a lot of pins. This project uses the NeoPixel ring to display colourful and vivid VU meter patterns.
- A 440 ohm resistor.
This is used to prevent the dataline from damaging any of the NeoPixels.
- A 1000 uF capacitor.
Connect this across the power lines to prevent the initial rush of current from damaging the neopixels.
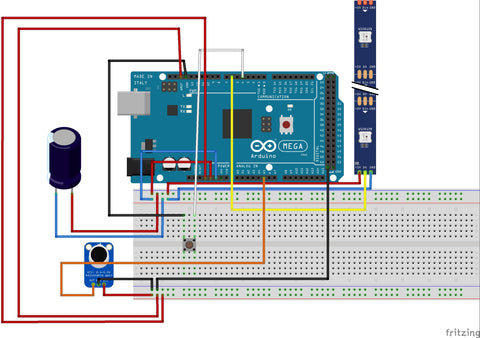
Connections
The microphones vcc pin should be connected to 3.3v along with AREF.
Make sure you connect the capacitor along the power lines, to prevent any damage to the neopixel.
One lead of the pushbutton goes to ground, other to digital pin 4.
If you use any external power source for the NeoPixel ring, make sure you connect the negative end to Arduino’s ground pin. Do not forget the 1000uf capacitor in any case.
Libraries required and code:
Install the NeoPixel and FastLED libraries by going to
Sketch>Include Libraries> Manage Libraries
And then search for these two libraries.
Once installed, here’s the code. Download the Mega_Vu zip file and include the header files for it to work.
If you want to know how the project looks like, here’s a video.
Author- MokshJadhav